Control API§
Unit’s configuration is JSON-based, accessible via a RESTful control API, and entirely manageable over HTTP. The control API provides a root object (/) that comprises four primary options:
| Object | Description |
|---|---|
| /certificates | Responsible for SSL/TLS certificate management. |
| /config | Used for general configuration management. |
| /control | Queried for application restart. |
| /status | Queried for usage statistics. |
The API is exposed through a socket whose type and address depend on the installation method. Its compile-time setting can be overridden at startup. For consistency and security, our examples use Unix domain sockets unless stated otherwise. Example queries use curl, and URIs are prefixed with http://localhost as the utility expects (the hostname is irrelevant for Unit itself), but you can use any HTTP tool you like. For instance, Visual Studio Code users may benefit from this third-party extension.
No configuration files used
The control API is the single source of truth about Unit’s configuration. There are no configuration files that can or should be manipulated; this is a deliberate design choice made to avoid issues such as:
- Undetected invalid states: Configuration files can be saved in an invalid state, and the issue won’t be seen until reload or startup. The control API avoids this by validating configuration changes on the fly.
- Too broad or too narrow configuration file permissions: If a configuration file is inaccessible, it can’t be loaded; if it’s public, sensitive data may leak. The control API has a single manageable point of entry.
- Unpredictable behavior: In a configuration file hierarchy, it’s easy to lose track and misconfigure something. With the control API, the entire configuration is a single, organized, and navigatable entity.
Replicating Unit states
Although Unit is fully dynamic, sometimes you just want to copy an existing setup without extra modification. Unit’s state directories are interchangeable as long as Unit version stays the same, so you can use a shortcut to replicate a Unit instance. Also, this works with the Docker images.
Warning
Unit’s state can change its structure between versions and must not be edited by external means.
On the machine where the reference Unit instance runs, find out where the state is stored:
$ unitd -h

      --state DIRECTORY    set state directory name
                           default: "/path/to/reference/unit/state"
Double-check that the state location isn’t overridden at startup:
$ ps ax | grep unitd
      ...
      unit: main v1.34.2 [unitd --state /runtime/path/to/reference/unit/state ... ]
Repeat these commands on the second machine to see where the target instance stores its state.
Stop both Unit instances, for example, running the following command as root:
# systemctl stop unit
Note
Stop and start commands may differ if Unit was installed from a non-official repo or built from source.
Copy the reference state directory to the target state directory by arbitrary means; make sure to include subdirectories and hidden files. Finally, restart both Unit instances running the following command as root:
# systemctl restart unit
If you run your Unit instances manually, --state can be used to set the state directory at startup.
After restart, the target instance picks up the configuration you’ve copied to the state directory.
OpenAPI specification§
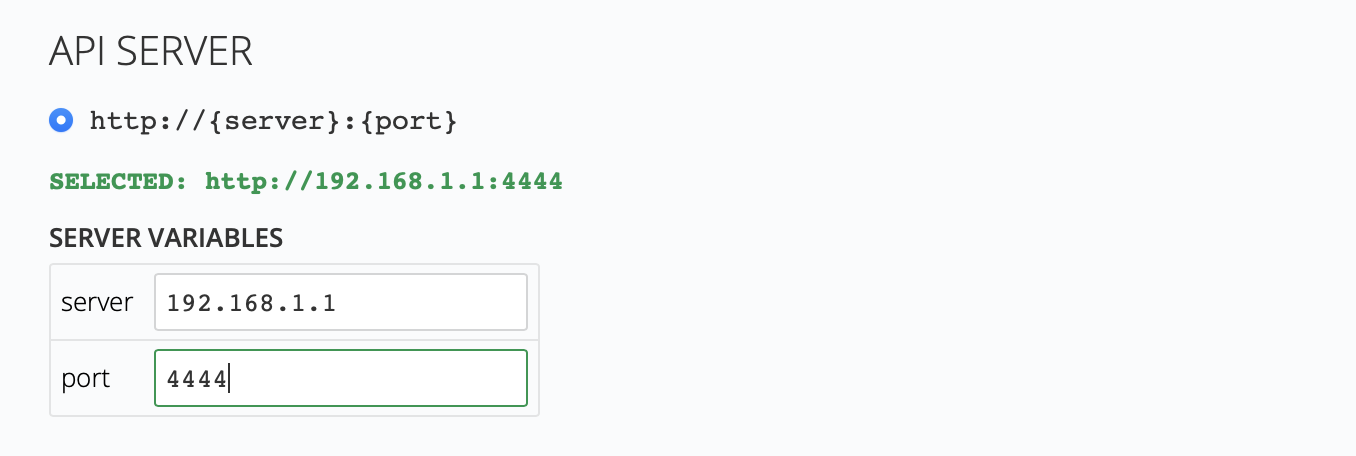
For a more formal approach to Unit’s control API, download the OpenAPI specification or try the interactive Docker
version. First, build the image and run a container:$ docker build --tag=unit-openapi -f unit-openapi.Dockerfile .$ docker run -d -p 8765:8765 -p 8080:8080 unit-openapiNext, open http://localhost:8765 in a browser.
To use this image against a pre-existing Unit instance, type in the address and port of the instance’s control socket (only IP sockets are supported now) on the page:
Quick start§
Note
Run the curl commands in this section as root.
For a brief intro, we configure Unit to serve a static file. Suppose you saved this as /www/data/index.html:
<!DOCTYPE html>
<html>
   <head>
      <title>Welcome to NGINX Unit!</title>
      <style>
         body {
         width: 35em;
         margin: 0 auto;
         font-family: Tahoma, Verdana, Arial, sans-serif;
         }
      </style>
   </head>
   <body>
      <h1>Welcome to NGINX Unit!</h1>
      <p>If you see this page, the NGINX Unit web server is successfully
         installed and working.  Further configuration is required.
      </p>
      <p>For online documentation and support, please refer to
         <a href="https://unit.nginx.org/">unit.nginx.org</a>.<br/>
      </p>
      <p><em>Thank you for using NGINX Unit.</em></p>
   </body>
</html>
Now, Unit should listen on a port that routes the incoming requests to a share action, which serves the file:
{
    "listeners": {
        "127.0.0.1:8080": {
            "pass": "routes"
        }
    },

    "routes": [
        {
            "action": {
                "share": "/www/data$uri"
            }
        }
    ]
}
To configure Unit, PUT this snippet to the /config section via the control socket. Working with JSON in the command line can be cumbersome; instead, save and upload it as snippet.json.
# curl -X PUT --data-binary @snippet.json --unix-socket  \
      /path/to/control.unit.sock http://localhost/config

      {
          "success": "Reconfiguration done."
      }
To confirm this works, query the listener. Unit responds with the index.html file from the share directory:
$ curl -i 127.0.0.1:8080

      HTTP/1.1 200 OK
      Content-Type: text/html
      Server: Unit/1.28.0

      <!DOCTYPE html>
      <html>
         <head>
            <title>Welcome to NGINX Unit!</title>
            ...
API manipulation§
To address parts of the control API, query the control socket over HTTP; URI path segments of your API requests must be the names of its JSON object members or indexes of its JSON array elements.
Note
If you often configure Unit manually, JSON command-line tools such as jq and jo may come in handy.
The API supports the following HTTP methods:
| Method | Action |
|---|---|
| GET | Returns the entity at the request URI as a JSON value in the HTTP response body. |
| POST | Updates the array at the request URI, appending the JSON value from the HTTP request body. |
| PUT | Replaces the entity at the request URI and returns a status message in the HTTP response body. |
| DELETE | Deletes the entity at the request URI and returns a status message in the HTTP response body. |
Before a change, Unit checks the difference it makes in the entire configuration; if there’s none, nothing is done. Thus, you can’t restart an app by reuploading its unchanged configuration (but there’s a way of restarting apps).
Unit performs actual reconfiguration steps as gracefully as possible: running tasks expire naturally, connections are properly closed, processes end smoothly.
Any type of update can be done with different URIs, provided you supply the right JSON. Run the following commands as root:
# curl -X PUT -d '{ "pass": "applications/blogs" }' --unix-socket \
       /path/to/control.unit.sock http://localhost/config/listeners/127.0.0.1:8300
# curl -X PUT -d '"applications/blogs"' --unix-socket /path/to/control.unit.sock \
       http://localhost/config/listeners/127.0.0.1:8300/pass
However, the first command replaces the entire listener, dropping any other options you could have configured, whereas the second one replaces only the pass value and leaves other options intact.
Examples§
To minimize typos and effort, avoid embedding JSON payload in your commands; instead, store your configuration snippets for review and reuse. For instance, save your application object as wiki.json:
{
    "type": "python",
    "module": "wsgi",
    "user": "www-wiki",
    "group": "www-wiki",
    "path": "/www/wiki/"
}
Use it to set up an application called wiki-prod.
# curl -X PUT --data-binary @wiki.json \
       --unix-socket /path/to/control.unit.sock http://localhost/config/applications/wiki-prod
Use it again to set up a development version of the same app called wiki-dev:
# curl -X PUT --data-binary @wiki.json \
       --unix-socket /path/to/control.unit.sock http://localhost/config/applications/wiki-dev
Toggle the wiki-dev app to another source code directory:
# curl -X PUT -d '"/www/wiki-dev/"' \
       --unix-socket /path/to/control.unit.sock http://localhost/config/applications/wiki-dev/path
Next, boost the process count for the production app to warm it up a bit:
# curl -X PUT -d '5' \
       --unix-socket /path/to/control.unit.sock http://localhost/config/applications/wiki-prod/processes
Add a listener for the wiki-prod app to accept requests at all host IPs:
# curl -X PUT -d '{ "pass": "applications/wiki-prod" }' \
       --unix-socket /path/to/control.unit.sock 'http://localhost/config/listeners/*:8400'
Plug the wiki-dev app into the listener to test it:
# curl -X PUT -d '"applications/wiki-dev"' --unix-socket /path/to/control.unit.sock \
       'http://localhost/config/listeners/*:8400/pass'
Then rewire the listener, adding a URI-based route to the development version of the app:
$ cat << EOF > config.json

    [
        {
            "match": {
                "uri": "/dev/*"
            },

            "action": {
                "pass": "applications/wiki-dev"
            }
        }
    ]
    EOF
# curl -X PUT --data-binary @config.json --unix-socket \
       /path/to/control.unit.sock http://localhost/config/routes
# curl -X PUT -d '"routes"' --unix-socket \
       /path/to/control.unit.sock 'http://localhost/config/listeners/*:8400/pass'
Next, change the wiki-dev’s URI prefix in the routes array, using its index (0):
# curl -X PUT -d '"/development/*"' --unix-socket /path/to/control.unit.sock \
       http://localhost/config/routes/0/match/uri
Append a route to the prod app: POST always adds to the array end, so there’s no need for an index:
# curl -X POST -d '{"match": {"uri": "/production/*"}, \
       "action": {"pass": "applications/wiki-prod"}}'  \
       --unix-socket /path/to/control.unit.sock        \
       http://localhost/config/routes/
Otherwise, use PUT with the array’s last index (0 in our sample) plus one to add the new item at the end:
# curl -X PUT -d '{"match": {"uri": "/production/*"}, \
       "action": {"pass": "applications/wiki-prod"}}' \
       --unix-socket /path/to/control.unit.sock       \
       http://localhost/config/routes/1/
To get the complete /config section:
# curl --unix-socket /path/to/control.unit.sock http://localhost/config/

    {
        "listeners": {
            "*:8400": {
                "pass": "routes"
            }
        },

        "applications": {
            "wiki-dev": {
                "type": "python",
                "module": "wsgi",
                "user": "www-wiki",
                "group": "www-wiki",
                "path": "/www/wiki-dev/"
            },

            "wiki-prod": {
                "type": "python",
                "processes": 5,
                "module": "wsgi",
                "user": "www-wiki",
                "group": "www-wiki",
                "path": "/www/wiki/"
            }
        },

        "routes": [
            {
                "match": {
                    "uri": "/development/*"
                },

                "action": {
                    "pass": "applications/wiki-dev"
                }
            },
            {
                "action": {
                    "pass": "applications/wiki-prod"
                }
            }
        ]
    }
To obtain the wiki-dev application object:
# curl --unix-socket /path/to/control.unit.sock \
       http://localhost/config/applications/wiki-dev

    {
        "type": "python",
        "module": "wsgi",
        "user": "www-wiki",
        "group": "www-wiki",
        "path": "/www/wiki-dev/"
    }
You can save JSON returned by such requests as .json files for update or review:
# curl --unix-socket /path/to/control.unit.sock \
       http://localhost/config/ > config.json
To drop the listener on *:8400:
# curl -X DELETE --unix-socket /path/to/control.unit.sock \
       'http://localhost/config/listeners/*:8400'
Mind that you can’t delete objects that other objects rely on, such as a route still referenced by a listener:
# curl -X DELETE --unix-socket /path/to/control.unit.sock \
        http://localhost/config/routes

     {
         "error": "Invalid configuration.",
         "detail": "Request \"pass\" points to invalid location \"routes\"."
     }